It’s Teacher Feature Thursday!
This week we are featuring Carolyn Eby, our school-wide art teacher! Carolyn teaches art to all of our children, but on this particular day I joined her for a lesson with our preschoolers. She meets with the three and four-year-olds every afternoon in small groups. In conjunction with the excitement of the Hirshhorn’s Kusama Exhibit, Carolyn decided to do a mini-unit on Yaoyoi Kusama, exploring her artwork and background. Below you will find images and descriptions of the lesson, and a reflection from Carolyn.

Here are a few images from their lesson on Kusama:


Carolyn’s Kusama unit began before any of the classes visited the Kusama Exhibit. Her lessons helped lay a foundation of knowledge about Kusama as well as build an appreciation for her artwork. All the preschool classes were excited to visit the exhibit and see firsthand the artwork they had been learning about in art class.
 Carolyn started this particular lesson by reviewing what they had done so far in their Kusama unit. They remembered the flat pieces that Kusama makes, and looked at the flat artwork they made with inspiration from Kusama.
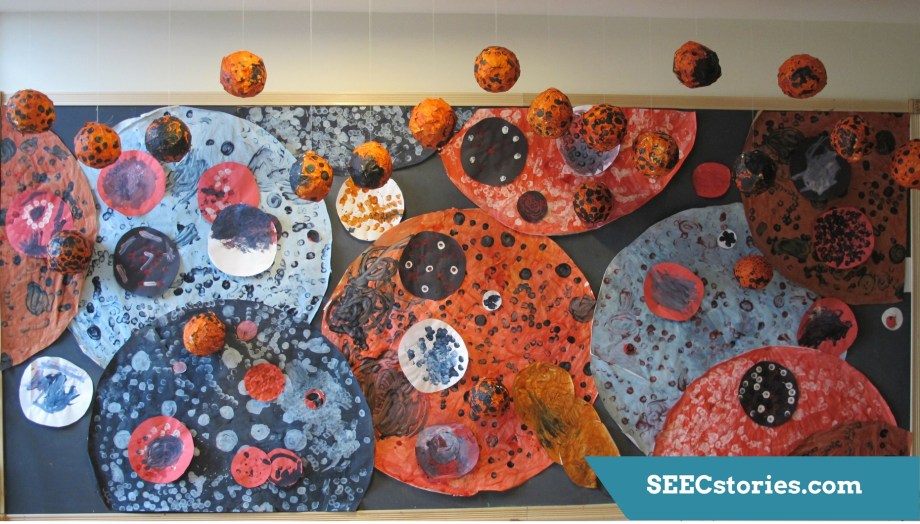
 They also talked about Kusama’s sculptural art, and looked at their spheres and “sock-sculpture” they had collaboratively made together in previous art classes.
 Carolyn told the children that there was one more type of art that Kusama makes that they hadn’t talked about yet – clothes! Carolyn explained that when Kusama came to the United States from Japan, she began to make her own clothes.
 Next, Carolyn said that Kusama is a designer, and asked the children what that meant. One child responded, “you make things!” Carolyn agreed and said that designers have a passion to make things and we use these things every day. She surprised the children by telling them that everything they were wearing was designed by someone. The children looked at their clothes and clips in their hair and expressed their shock that someone actually designed the items they were currently wearing.
 To explore the idea of a designer further, Carolyn read D is for Design ABCS from Cooper Hewitt, Smithsonian Design Museum. They looked at multiple products that serve the same purpose, but noticed how the design of these items can be very different. For example, all chairs are meant to be sat in, but they can vary tremendously in their size, color, shape, etc. Carolyn explained that designers must think about lines, shapes, and colors when making something.
 The class then looked at images of Kusama in her clothes and noticed patterns. Some questions Carolyn asked were, “Are the polka dots carefully placed or random?” “Do the polka dots go in a line?” “What size are the polka dots?” Through this careful looking of Kusama’s art, the children were analyzing the fundamentals of art that they learned about at the beginning of the year including shape, line, and color.
 Then it was the children’s turn to be a clothing designer! They had each brought in an old shirt from home, and the first step was placing a piece of cardboard inside the shirt so that the paint didn’t leak through from one side to the other. This was tricky for many of the children, and Carolyn encouraged teamwork to accomplish the task.
 The next step was taping down the sleeves on the back, so that the shirt was tight on the cardboard, making an easy surface for the children to paint on.
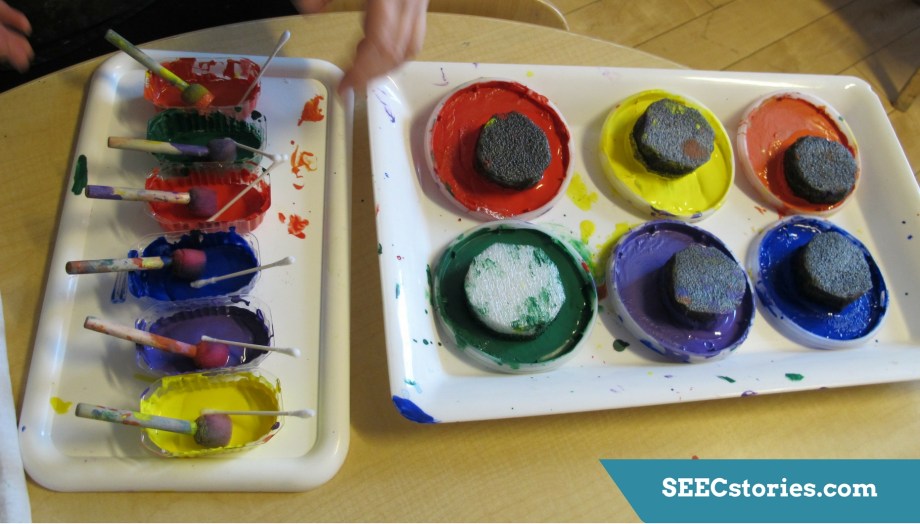 Carolyn had acrylic paints and tools ready to go. She explained that unlike the paint they normally use, acrylic paint does not wash out of clothing, so they needed to be extra careful! She showed the children the colors, as well as the tools to make different sized polka-dots. There were cotton swabs for small dots, foam circle paint tools for medium dots, and circles cut from foam packaging for large dots.
")


The children set to work using Kusama’s polka dots as inspiration for their shirts, but they added their own perspective and creativity. They talked to their friends about what they were making including carrots, snowmen, and rain clouds.
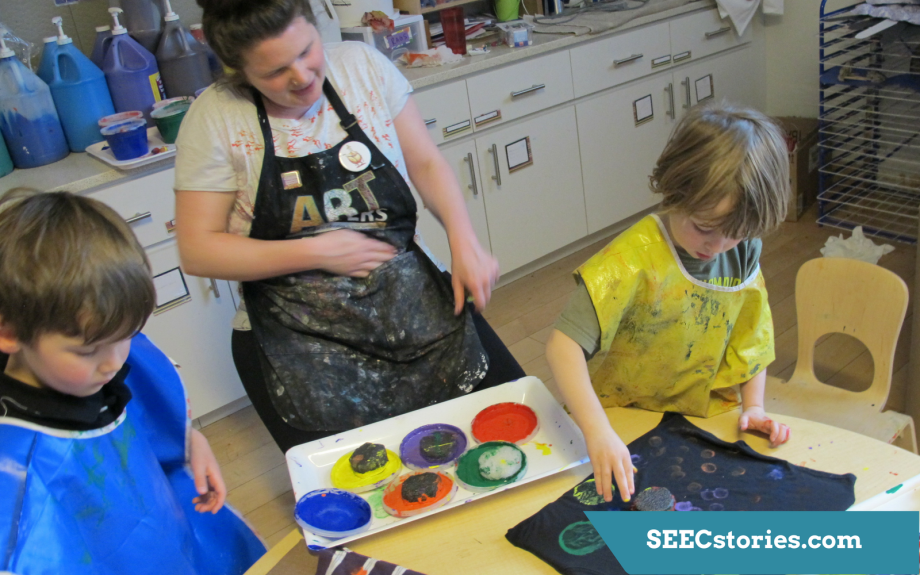 Carolyn came around with the large polka dot tools and paint, and showed the children how to use two hands to get the tool off of the paint tray. After one child used the large polka dot tool, he said, “Hey! Look, I made a tire!” Carolyn asked how he did this and he showed Carolyn how he pressed the tool down hard and then turned it slightly back and forth without lifting it, making tread marks.
 While all the children used the same tools and artist as inspiration, each designed a very unique shirt. When I asked this child about her design, she said, “I just had to think of it, and then I made it. It’s a flower!”
A reflection from Carolyn:
When the Yayoi Kusama exhibit opened at the Hirshhorn Museum, I was lucky enough to visit, and what I saw was so inspiring! I knew that each of the classes was planning a trip, and I really wanted to create a collaborative art piece with them that would help them process the exhibit and make their experience in the space much more meaningful. I wanted to make sure that in this unit children explored the different types of artwork that Kusama made (sculpture, painting, clothing design, etc.), techniques she used to create these artworks, and elements of Kusama’s characteristic style. Additionally, I always have an objective in the art studio to cultivate students’ curiosity about what they see in the museums, community, and classroom. I also want them to feel empowered by their ability to create. To prepare for the lessons, I did some research about Kusama, but we also used the tool of observation and discussion when looking at pictures of the artist, her artwork. We reflected together on their visit to the exhibit to ascertain what the children were most curious about and wanted to make. With this particular unit I loved the questions the children asked about Kusama’s life and work, and their wonder when we finally put all the pieces they had created together.
During this particular week we took a close look at Kusama’s fashion career. We looked at pictures of Kusama in outfits she created, as well as photos of her fashion collaborations with Uniqulo and Louis Vuitton. We talked about what it means to be a designer, which is important to me because I want students to know that art is not only paintings and sculptures, but around us daily, whether it be a chair or shirt. We read through “D is for Design: ABCs from Cooper Hewitt, Smithsonian Design Museum” and looked at different objects that artists design. I loved our discussion about translating an artist’s style from paintings to clothing. The children made personal connections to the concept of designing, for example, one child referred to his father having a hand in designing jewelry for his mother! Another aspect of the lesson that I found surprising was the children’s response to using a different type of paint. I think that the students loved the responsibility of using “real acrylic artist paints” and it made an impact on how carefully they designed their shirts.
In order to better prepare for next time, I would try to create more countertop space in the art room so that I could accommodate more art supplies. The studio itself is always a game of logistics with regards to materials! I want to make sure the kids have access to the tools we are going to use, but figuring out how to introduce them during the project or how to arrange them for their ease of use is always tricky and something I am always working on! For this particular lesson I only had one set of large circle stamps with paint for the children to make large polka-dots on their shirts. I began the week by taking the large stamps to each child, however, after spilling the paints twice, I set up a table for the artists to visit (I am lucky to have neighboring classrooms that are very generous with extra furniture. Thank you, Honey Bears!). This enabled the children to take their time with the large stamps, while I was able to use my energy visiting and checking in with other children as they worked on their designs. My recommendation to any other teacher with this lesson is to try your best to connect the fact that each and every piece of clothing they are wearing is made by a designer. This is a BIG idea that children might not think of, and having them begin that thought process changes their view of what an artist is. Since this lesson we have been taking a deeper look into fiber arts and we have even worked on doing some embroidery!
