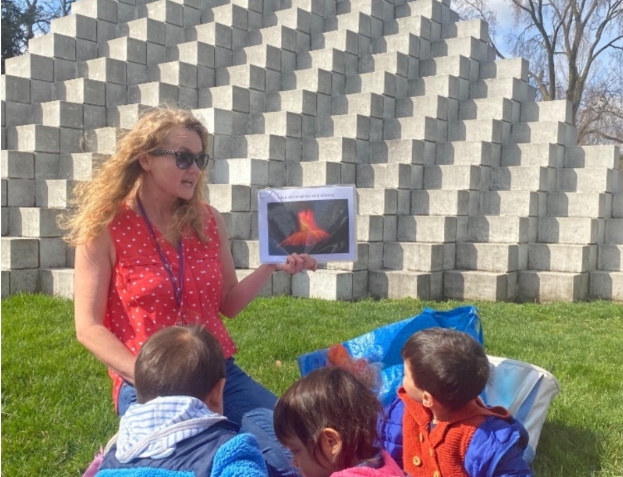
For young children, books are magical, useful, and familiar. They are a classic circle time tool and are wonderful for explaining complex topics. Yet, for many museums no published books exist that explain their objects or their institutional values. Instead of relying on existing children’s books, the Smithsonian Early Enrichment Center (SEEC) has started creating our own books which act as scripted lesson plans with embedded images. These books can be easily applied to multiple programs.
Getting Started
To design our books, we use a presentation program. Best practice is to include one or two large photos and two lines of large font text per page. (There are several examples of pages from our books found in this blog.) If the object needs more context or explanation, it can be included in the author’s note. Books can be printed, laminated, and then collated in a ring binder for ease of use. A photo album service can also be used to create a more traditional looking book.
Interactive Stories
Interactive elements for your story times can be built into the books you create. The book can prompt you to encourage children to pretend, move, sing, and experiment. Writing activity breaks directly into the book allows children to have the opportunity to be active participants throughout the whole story time experience.
Questions & Wait Time
Core museum education practices such as asking questions and giving wait time can be written into books, too. We often ask a question on one page and make sure the answer is on the next page. Making the educator or docent turn the page is one way to intentionally slow down the reading of the story and allow for thoughts and conversations to develop.
Familiar / Unfamiliar
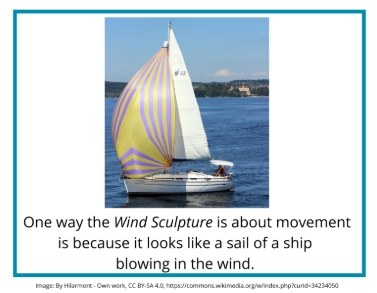
To start creating books, we identify and leverage subjects that are familiar to young children to create context for the unfamiliar. In writing our Wind book, we knew that most pre-k children have some familiarity with sailboats. They may play with boats in the bathtub or may have sailed on a real boat. Early in the book we made the connection that the Wind Sculpture was like a boat. This grounded the book in the familiar, and from there, we made additional connections to the unfamiliar.
Translating Complex Ideas
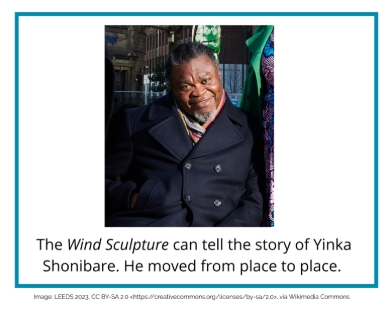
Our goal when creating books is to convey the true meaning of the objects to young children. Since source materials are not accessible to children, it is our responsibility to adapt them to make connections to the familiar. Artist Yinka Shonibare described the meaning of his piece as “None of us have isolated identities anymore, and that’s a factor of globalization” and we translated that quotation as:
Scripts & Key Phrases
Rooted in the philosophy of anti-bias education, SEEC uses the phrase, “We are all the same. We are all different.” This key phrase helps young children foster a positive sense of self while embracing diversity. Since this phrase is core to our hidden educational theories and values, we embed this script into our books. We encourage you to consider what values are core to your organization and how you can create a script that is relatable to young children and reflects those core values.
Longevity of Books
These books that we write can easily be pulled off a shelf and read. This makes them incredibly useful and easier to implement than a lesson plan. We love that they can be used over and over again by different classes and educators. Writing books may not be something that every preschool or museum educator does in their daily practice, but we encourage you to try, and you will likely have a product that you reach for again and again.
The closure of the federal government, beginning October 1st, 2025, impacted much of Washington, D.C. and SEEC was not immune to the ripple effects. SEEC educators began preparing for the possibility of a federal government shutdown by re-evaluating how we utilized our community spaces. Taking our classes into our community on a regular basis is an integral part of our object-based and inquiry-based learning philosophy. What do our days look like when one of the key pillars of our community, the Smithsonian museums our classes call home, is closed for an indeterminate amount of time?
While the Smithsonian museums are a major resource and source of inspiration for our educators, SEEC teachers are also well versed in using other parts of our community to inform their lessons. At SEEC, we believe that learning can happen everywhere, not just in a classroom or a museum gallery. Educators routinely host lessons on the National Mall, utilize local businesses, and tap into creative explorations of places they’ve been before.
From explorations of architecture to farm animals to fairytales, SEEC educators rose to the challenge of using our community spaces during a government shutdown.
Toddlers Explore The Built Environment
Our youngest toddler class, the Toucans, took the government shutdown as an opportunity to switch topics and begin a multi-week investigation of the built environment. These little learners, ranging from 12-18 months old, started their architecture unit exploring various building materials in their classroom.
After looking at wood, brick, and stone, the class went on a walk to MLK Library and made a stop at St. Patrick’s Catholic Church to discuss the materials they could see and take turns touching the rougher stone of the building facade and the carved stone of the archway. The toddler teachers realized that building materials were all around them and that each city block offered a new and exciting learning opportunity for the class.
The Toucans continued their study of buildings and architecture by visiting the construction site at the Hirshhorn Sculpture Garden. The students were so excited to see some of the tools and construction vehicles they had been reading about in their classroom. Through a lot of pointing and excited sounds, the teachers could tell the students were making connections between objects they were seeing on their community visits and the toy versions they had been playing with.
Caption: Toucan Toddler class explores the stone walls of St. Patrick’s Catholic Cathedral and the carved stone of the columns.
Twos Bring the Farm to the National Mall
Prior to the government shutdown, one of our two-year-old classes, the Penguins, began a unit on farm animals. What started as an exploration of horses soon transformed into a deep dive into life on a farm. When the federal government shut down, the Penguins took their classroom outside and enjoyed a nice long walk over to the National Park Services Stables. They compared the barns they had in their classroom to what they could see at the stables. As the shutdown progressed, they continued their investigation of farm animals by discussing pigs and cows.
During their week on cows, the class learned where milk comes from and how milk is turned into butter. The Penguins took their learning back outside to practice ‘milking’ a cow using a plastic glove, water and a bucket. Each student had the opportunity to squeeze the makeshift udder and watch as the ‘milk’ came out and collected in the bucket below. They culminated their week on cows by creating their own butter. Using heavy cream and small, tightly sealed, containers, the Penguins were able to shake the cream until it turned into soft butter. They could see the change happening before their own eyes! This progression of farm animals to food allowed the class to transition into a lesson other foods are found on farms.
Caption: Penguin Twos Class takes turns squeezing milk out of a plastic glove ‘udder’ during their week on cows (left). Students look at horses at the National Park Service Stables (right).
Fours Imagine Fairytale Creatures in DC
SEEC’s four-year-old class, the Honey Bears, expressed interest in storytelling right before the government shutdown began. While they couldn’t visit the National Gallery of Art to look at Rogier van der Weyden’s Saint George and the Dragon, they could pretend to be giants towering about the city on the rooftop of MLK Library. The outdoor rooftop garden was the perfect place to use their imagination and see the world through a giant’s eyes. Four stories up, the Honey Bears read Jack and the Bean Stalk and discussed how different the city looked so high up.
Later that same week, the Honey Bears went over to the water feature outside of the National Museum of the American Indian (NMAI) to talk about what they need to trap a mermaid. The water feature became their mermaid lagoon and using their nets, the Honey Bears searched for mermaids and sunken treasure. These outdoor visits enabled the students to really use their imaginations and practice their dramatic play skills.
Caption: Honey Bear Fours class prepares their net to catch a mermaid (left). Students investigate the mermaid’s treasure outside NMAI (right).
While the government shutdown, and the subsequent closure of many museums, offered challenges for SEEC educators, they were able to make the pivots they did because of the foundational understanding that our community is more than just museums. For teachers at SEEC, the classroom extends beyond the museum galleries and out into the world around us. Our classrooms can be the local library, outdoor fountain, stable, and the exterior of a church. It is less about where children learn, and more about how they learn.
Teachers were able to seamlessly continue the learning happening in their classrooms because they are confident in their ability to teach using real life objects and experiences. While pictures and books are a vital part of early learning, SEEC believes that children learn best through exposure to tangible objects and concepts. This hands-on approach allows students to make connections for themselves and helps bridge the gap between the familiar and the unfamiliar. It is possible to explain to a toddler how cream turns into butter but allowing them to shake a jar until the butter separates from the milk offers a deeper understanding of the process. The hands-on experience moves the learning from conceptual to tangible.
These hands-on experiences and community visits won’t disappear with the re-opening of the federal government. Classes will still take trips to MLK library, explore the architecture of the buildings around SEEC, and visit horse stables. Those kinds of visits will be in conjunction with visits to museum galleries, just like SEEC has done since our founding. We are so excited to bring our classes into all parts of our community and to continue to share how the learning extends beyond the classroom.
This teacher feature focuses on the older infant (Duckling) class’s exploration of Bubbles and the development of their classroom exhibit: HOME during the month of May. At this point of the year, students in the Duckling class were between the ages of 14-20 months old.
Preparation:
Why and how did you choose the visit?
The Ducklings were showing their teachers an increased interest in helping clean the classroom throughout the day. After each meal at school, the Ducklings would ask to help with a “Task,” such as wiping down the table, carrying dirty dishes to the kitchen, and putting the laundry in the laundry room. The students were excited to help and to mimic what their teachers were doing. The Duckling educators decided to follow that interest.
What were your topics of exploration?
This month-long exploration was all about Bubbles. Each week focused on a different way to encounter bubbles: Laundry, Dishes, and Bathtime. The class then spent the last week of the month discussing how we can take care of the spaces and things in our home. The unit concluded with the classroom Exhibit entitled HOME to show off all their hard work.
What were your learning objectives? (What did you want your children to take away from the lesson?)
There were a few learning objectives for the Bubbles unit. A major focus was for the Ducklings to gain a sense of autonomy and independence in their space. Throughout the month, the students had opportunities to decide how they wanted to interact with the lesson. For example, there were spare clothes available to the students during the week on Laundry. They could then decide if they wanted to practice putting on and taking off the clothes, pretend to wash them in the model washer and dryer, or work on hanging them up on the clothesline set up in the classroom. Having these options available allowed the students to decide for themselves where their interests lay and to work on a variety of gross and fine motor skills.
Caption: Two infants practice hanging clothes on a pretend clothesline in their classroom
Caption: Duckling infant class explores spare clothes and laundry baskets on the floor with their educator.
Another goal was to create a positive association with cleaning as it can be a difficult part of a child’s daily routine. By allowing them to create a mess and then have them help clean it up, the teachers could show the students that cleaning up after ourselves (a skill they will continue to develop later in life) is just as engaging as the mess making.
Implementation:
What was most successful about your lesson?
The most successful part of the whole month was watching the Ducklings get objects dirty and then get excited to clean them. It was a real full circle moment for the class. Over the course of the month, they would return to this cycle a number of times. First, they painted with dishes and utensils and when they were done painting, they cleaned them in soapy water. The class repeated this activity with toy cars in “mud” (brown paint) and then, again, using their full bodies. By the end it was clear to the teachers that the students understood that something gets messy and then it gets clean.
Caption: Duckling students painted with their toys cars in “mud” (brown paint) and later washed the cars clean at a “car wash.”
Another successful element was the cardboard washer and dryer Calla and Kevon built prior to the unit. The Ducklings quickly learned that they could move clothes from one machine to another and that the washer and dryer were only meant for clothes. It was great to see their gross and fine motor skills as well as their spatial reasoning skills in action as they moved clothes and turned the dials.
Caption: Duckling student shows off her laundry and coordination skills by moving the clothes from the washing machine to the dryer
How did the lesson reach your objectives to expand the topic?
Each week the Ducklings got to focus on a different way they could clean and interact with bubbles. They would have similar experiences, such as painting and then cleaning up, but the methods would be different enough to expand their understanding of cleaning.
The Ducklings were able to build on their prior knowledge of what it means to clean in order to understand how to clean with the new objects in front of them. For example, they were used to seeing their teachers clean the table with washcloths and liked to help rub down the table. The teachers took the class to Within These Walls at American History to discuss laundry. When presented with a washboard, typically used for cleaning clothes, they talked about how they could “rub, rub, rub” their washcloths on the board just like they would on the table. When their teacher placed a modern washboard basin in front of them, the Ducklings quickly associated that washboard with the one they had seen in the museum.
Caption: Ducklings went to visit the laundry portion of the Within These Walls exhibit before returning to their classroom to do some washing of their own. They took their washcloths and got them clean in their soapy water buckets.
What was successful in terms of your preparation and logistics?
What made this lesson so successful was having everything prepared in advance. The Duckling educators knew that they wanted to spend an entire month talking about bubbles and cleaning, so they spent time thinking about how to break that down into smaller topics. This enabled the team to dive deeper into each topic but still create a cohesive lesson as the month progressed.
The Duckling team also intentionally revisited spaces and concepts. They took more than one visit to Inside These Walls during their month-long unit. This allowed the Ducklings to become a little more familiar with the space and more comfortable engaging with the exhibit. They followed a similar thought process for their art lessons during the month. By using a similar formula for their art projects, they allowed their art making to become a routine. The children were able to know what to expect and, therefore, they spent more time exploring and engaging with their projects.
Reflection:
How did you document the lesson in order to reflect back on the work?
The Duckling’s month-long exploration on Bubbles culminated in their classroom exhibit entitled HOME. The students spent so much time exploring bubbles and cleaning that it felt like the perfect topic for an exhibit and to have their adults come and see their hard work. While not every project was displayed for the exhibit, the Duckling team chose to focus on displaying work that showed the process of getting things dirty and then getting things clean. The art around the classroom was the biproduct of that exploration.
Caption: Ducklings students made bubble art by making bubbles with colored water and transferring the bubbles onto paper. Once dry, those art works were hung on a pretend clothesline for their classroom exhibit.
The teachers also decided to bring back out the different cleaning stations they learned about during the month. There was a pretend bathtub, a toy kitchen, the washer and dryer, the laundry line, as well as brooms and dust pans. These stations were in place for the Ducklings to show their adults all the new gross and fine motor skills they developed over the month.
Each station was brought out because it spoke to the interests of the children. There was a way for each child to engage, and work samples were present for each student.
Caption: During the exhibit, one Duckling was exciting to show off her fine motor skills back at the clothesline.
What could you have done differently to better achieve your objectives and expand the topic?
There is always room for improvement in lesson planning, and if the Duckling team were to do this lesson over, one thing that they’d like to do is to scaffold some of their exploration out a little differently. For example, instead of putting up a clothesline, hanging clothes on it, and just letting the children explore, the team would have liked to break it down into smaller experiences first. Like just practicing pinching the clothes pins open and shut, then trying to balance clothes on a more solid clothes line, then transitioning to a string line. This slower introduction would have helped the students make their own connections.
What was challenging regarding logistics?
One challenge was finding the balance between experiencing getting messy and ensuring that the students are safe. Water play, and full-body paint exploration, can get slippery if the educators aren’t keeping a close eye on the situation. It can be a fine line between letting the children explore as they want to and making sure they keep their bodies safe. The Duckling team did their best to let the children explore freely by working to mitigate the mess before it happened. During water play, for example, they covered the floor with towels ahead of the play.
What recommendations would you have for another teacher trying out this lesson?
The biggest recommendation is to let the children experience the real thing, whenever possible. If the class is discussing how clothes get laundered when they get dirty, spend a day doing just that! Let the children get their clothes dirty, have them change, and then walk them through the steps of washing their clothes and take the time to investigate each step. The Ducklings loved being involved in the many steps of keeping themselves and their classroom clean.
Earlier this year, educators across SEEC’s vibrant community came together for an all-class meeting led by our Office of Engagement and Administrative Team. With representation from every classroom serving children from 2 months to 4 years, this gathering was an opportunity to reflect, share, and envision the future of our learning environments.
The heart of the presentation focused on how classroom environments at SEEC should be more than just spaces—they should be reflections of what’s happening in the life of each class. They should be intentional, curated, and consistent across our community. As a lab school that integrates museums, community connections, play, and object-based learning, our environment serves not only as a backdrop, but also as an active participant in the learning process.
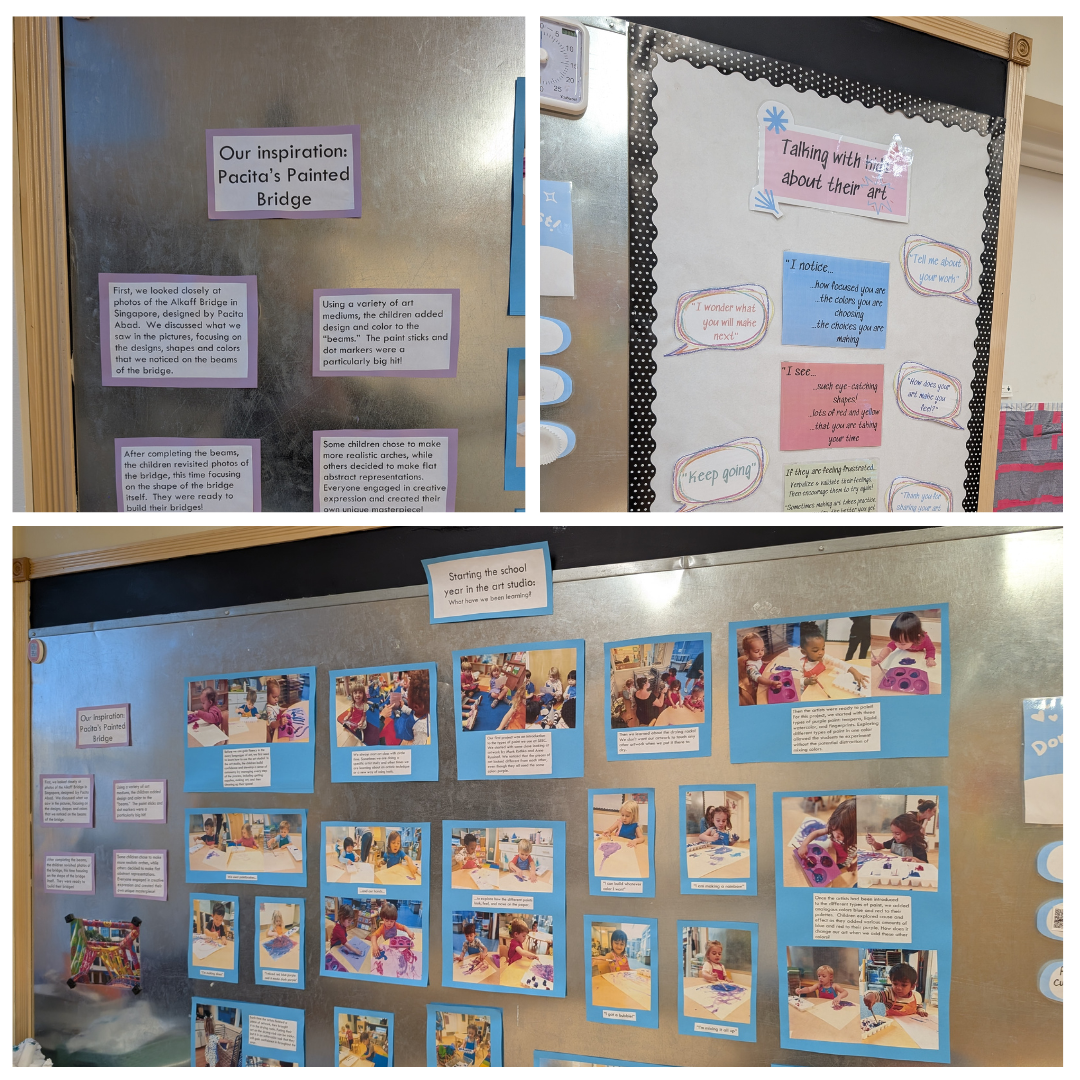
The display boards in the Art Studio about the children’s exploration of Pacita’s Painted Bridge; the top left board discusses the inspiration from the art with descriptive posters, the top right board features a “Talking with Art” theme with children’s art and comments, the bottom board showcases multiple photos and descriptions of children engaged in the process of creating their pieces.
Documentation is …
“An effective piece of documentation tells the story and the purpose of an event, experience, or development. It is a product that draws others into the experience—evidence or artifacts that describe a situation, tell a story, and help the viewer to understand the purpose of the action”
Art display featuring a colorful collage with images, patterns, and cellophane fish, all pinned on a wall. It also features photographs of the children creating the fish, an image of Untitled by Simon George Mpata and a description plaque of the children’s exploration.
Guidelines for Curated Spaces
The administrative team outlined several key guidelines for building and sustaining rich classroom environments. One major takeaway was the idea of keeping displays fresh and relevant by changing them out monthly in alignment with each class’s unit of learning. Educators were encouraged to use real photos whenever possible, and to be mindful of how someone without any context—a new family, a visitor, or even a child—might engage with the documentation they encounter.
Importantly, the team challenged educators to think beyond the bulletin board. Documentation should be thoughtfully showcased, using the full range of space within the classroom to reflect learning, discovery, and growth. Typed descriptions should support the visuals, offering clear, intentional narratives about what is happening and why it matters.
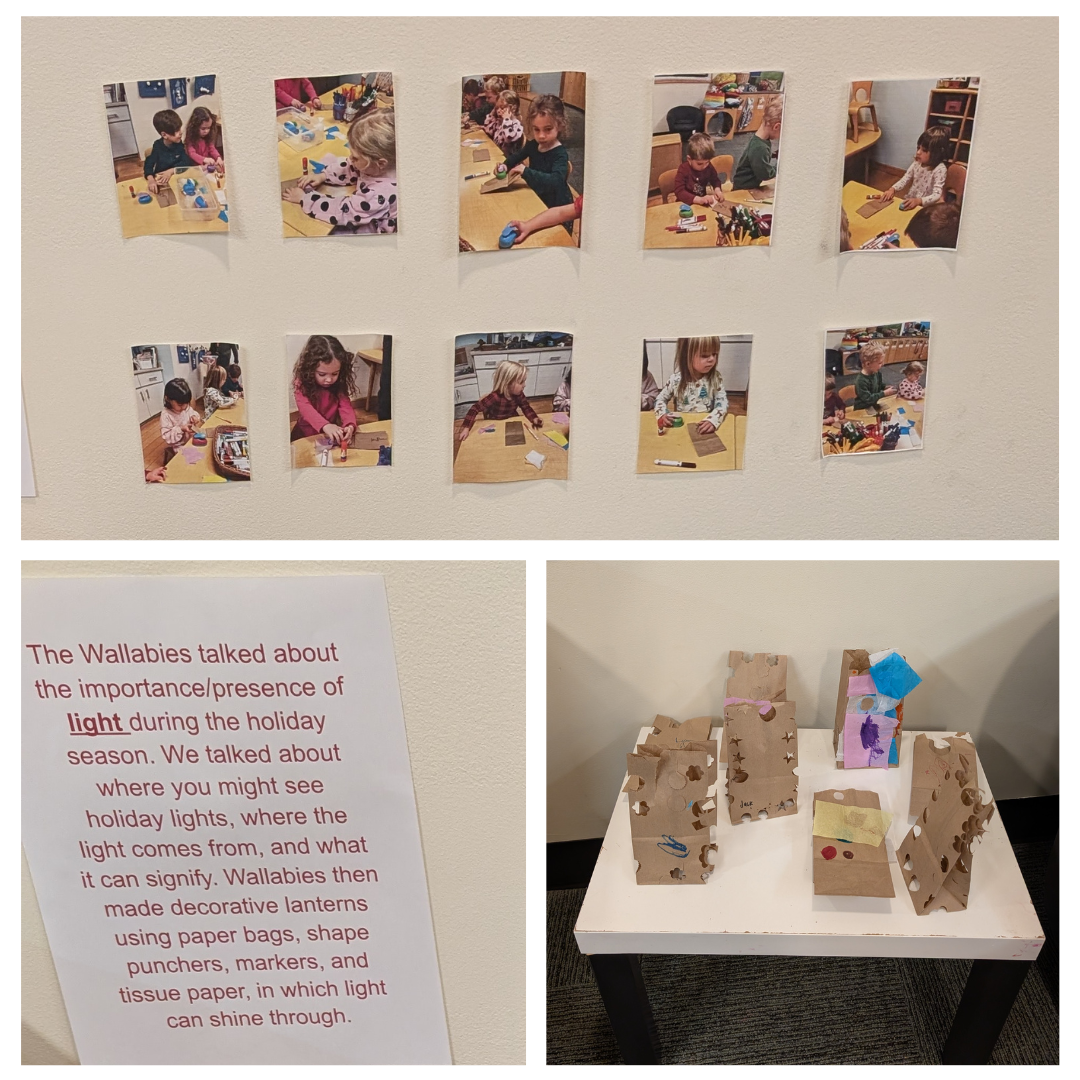
A display featuring multiple photos of children in our Threes class engaging in the process of creating lanterns, and a text panel describing their exploration of lights during the holidays, complemented by a display of their lanterns.
Showcasing the Extraordinary
Another theme of the presentation was recognizing and intentionally showcasing the extraordinary work that is happening every day in our classrooms. Documentation is a tool for storytelling—and those stories should be shared with our caregivers, our peers, and the children themselves. It fosters connection, supports classroom community, and builds trust with families.
We revisited an important question: Who is documentation for? The answer was multifaceted. It’s for children, who deserve to see their learning reflected back at them. It’s for caregivers, who want to understand and engage with their child’s experience. It’s for fellow educators, directors, and even for each of us as individual educators—a way to reflect on and grow in our own practice. It’s also a window for new families into the values and rhythms of SEEC classrooms.
Left: An outdoor class exhibit with a child and their caregiver viewing paper artworks.
Right: A caregiver reading a description of their child’s class art display while two children and two educators engage in play and story time.
Engaging Children Through Environment
The team emphasized that placement matters. Documentation intended for children should be placed low enough for them to engage with it—yes, even to touch it. When we introduce materials thoughtfully and set expectations, children can interact with their learning environment in respectful and meaningful ways.
We also explored how the environment itself can shape classroom behavior. A carefully arranged, engaging, and responsive space can reduce challenges and support deeper exploration. Our surroundings can either hinder or enhance the work we do—and we have the power to use them intentionally.
Wall display at child level featuring one of our Twos’ class artworks and a descriptive plaque, in a classroom setting.
From Discussion to Action
The presentation concluded with an open dialogue. Educators discussed practical concerns—how to manage time constraints, where to print documentation, and how to embrace the idea that children will interact physically with the materials on display.
In the five months since, educators across SEEC have taken this guidance to heart. Classrooms are now filled with purposeful documentation that highlights the daily wonders unfolding in our community. From toddler rooms to preschool spaces, there’s a renewed commitment to documenting learning not just consistently, but meaningfully.
As we look ahead, our goal is to continue growing in this work—pushing ourselves to create environments that don’t just display learning but deepen and celebrate it.
Top: A display in our older infant class featuring the work of Alma Thomas alongside the children’s artwork. Bottom: Abstract paintings and textured art pieces by one of our toddler classes, and a central portrait of Piet Mondrian with a description of the children’s exploration of his art.
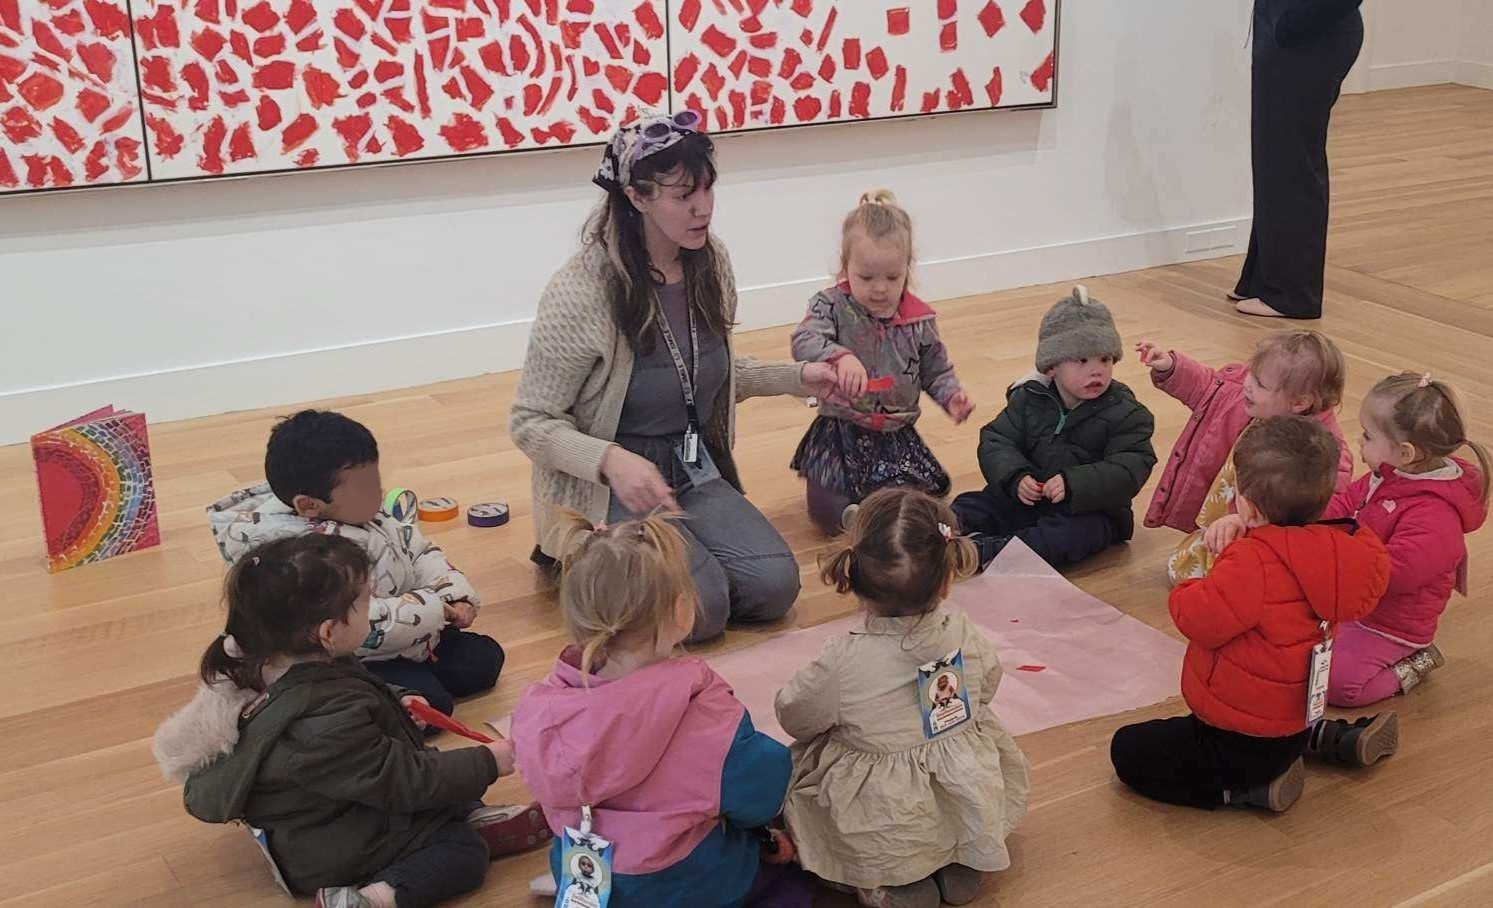
Our Twos class recently spent some time talking about colors. On this day, the focus was on the vibrant color red and its name. To make the learning experience even more engaging, this Twos class drew inspiration from Alma Thomas’ stunning artwork, Red Azaleas Singing and Dancing Rock and Roll Music, at the Smithsonian American Art Museum @americanart.
One of our Twos educators began this lesson with the story Ablaze With Color by Jeanne Walker Harvey to capture the attention of the children and introduce them to Alma Thomas.
What were the learning objectives? (What did you want the children to take away from the lesson?)
This visit was an opportunity for our young learners to begin recognizing and appreciating colors in a real-world context. The bright and lively hues of Thomas’ painting captivated their attention and sparked their curiosity, making the concept of color recognition both fun and memorable.
The educator passed out pieces of red tape to each child for the ‘Doing” portion of their visit at the Smithsonian American Art Museum. The background features Alma Thomas’ Red Azaleas Singing and Dancing Rock and Roll Music
Implementation:
What was most successful about the lesson?
How did the lesson reach your objectives to expand the topic?
The most successful aspect of the lesson was the Twos educator reading “Ablaze with Color” by Jeanne Walker Harvey, a captivating story about Alma Thomas’ journey as an artist and her love for vibrant colors and the collaborative art created by the children. This beautiful story naturally facilitated the children’s exploration and appreciation of colors, sparking a conversation about the small red pieces in Thomas’ paintings. The lesson reached its objectives by expanding the topic through this engaging story, which encouraged the children to delve deeper into the world of colors and art.
What was successful in terms of preparation and logistics?
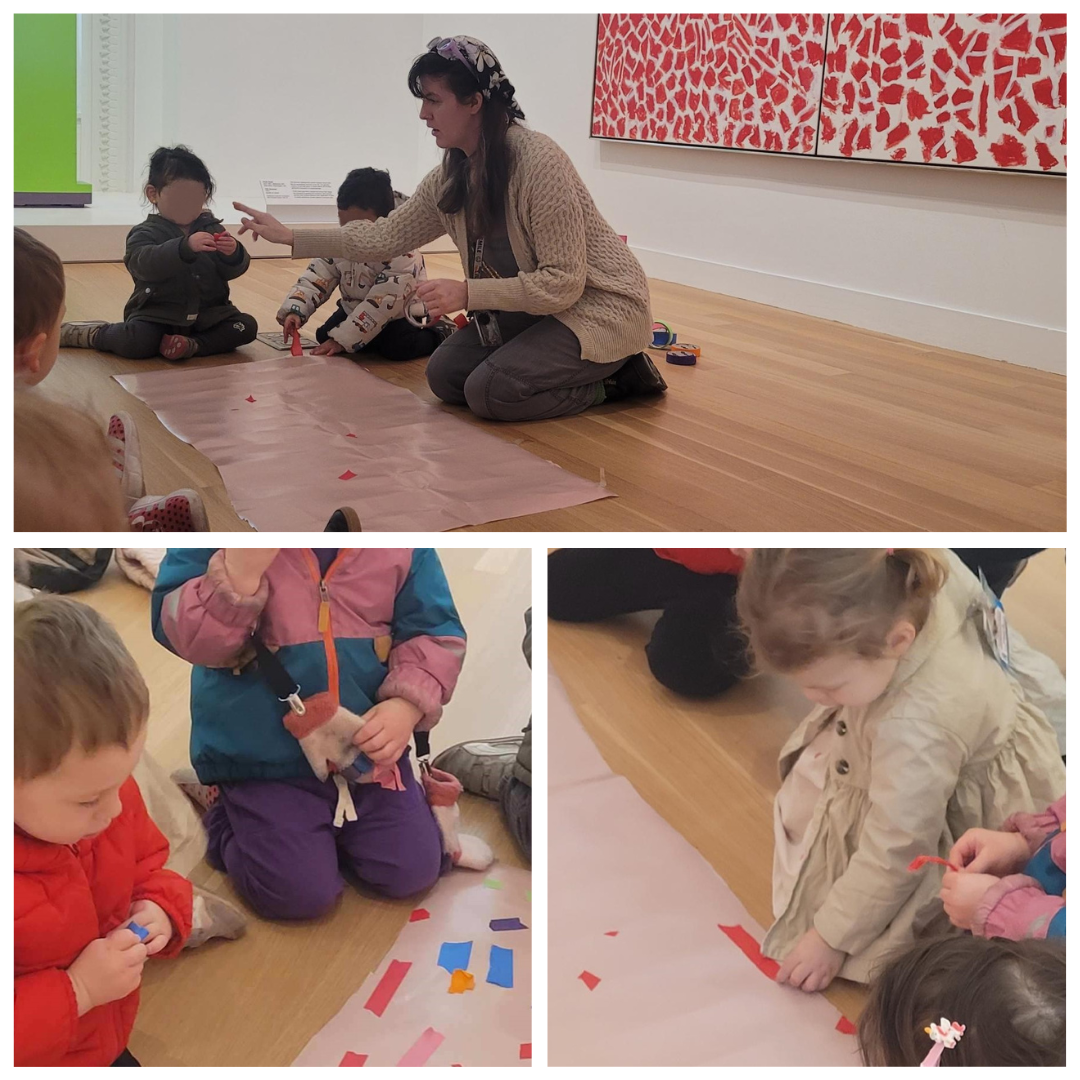
The children were inspired by the story and discussion, which led to a wonderful opportunity for them to create a collaborative piece of art in the gallery. By emulating Alma Thomas’ unique style, they used small pieces of colored tape on contact paper to craft their own vibrant masterpiece. This hands-on activity not only deepened their understanding of colors but also allowed them to express their creativity in a fun and engaging way.
The educator gave each child the opportunity to place the pieces of tape onto a larger piece of contact paper for a collaborative art piece inspired by Red Azaleas Singing and Dancing Rock and Roll Music
Reflection:
What could have been done differently to better achieve the learning objectives and expand the topic?
To enhance their connection with Alma Thomas’s work, bring along multiple small prints of her pieces (you can find examples of her colorful abstract art in books or online). Having a print for each child allows them to hold and closely observe the details while viewing a larger piece, fostering a more personal engagement with the artwork.
You could also bring along color words paired with their corresponding colors to encourage early literacy. For example, having “red” written on a red card or “blue” on a blue card can help young learners associate written words with visual cues. It’s a simple and fun way to integrate literacy skills into an art-themed adventure!
Additionally, introduce the tools Alma Thomas used to create her masterpieces—such as a canvas, paintbrush, or any other materials. This hands-on approach offers insight into how artists work and inspires creativity.
What was challenging regarding logistics?
The Smithsonian American Art Museum (SAAM) opens its doors at 11:30 AM, which is not ideal timing for our young learners. We’re so grateful to have the option to request tours before the museum officially opens, making visits more accessible for our group. If visiting at 11:30 doesn’t work for your schedule, you can also see Alma Thomas’s vibrant Watusi (Hard Edge) on display at the Hirshhorn Museum—another fantastic option to explore her incredible artistry!
What recommendations would you have for another teacher trying out this lesson?
If you’re inspired to explore the work of Alma Thomas like our Twos class, here’s an idea to create a meaningful and engaging experience. Start by defining the space for each child and ensuring a respectful distance from the artwork. A small blanket or portable morning meeting circles can help provide a clear boundary between the class and the art, creating a cozy yet organized setting.
To extend this experience into an art-making activity, colorful tape is a great way to replicate Thomas’s unique style. If colorful tape isn’t accessible, don’t worry! You can use vibrant pieces of construction paper in combination with contact paper to mimic her bold, textured patterns.
This setup not only helps children appreciate art but also encourages exploration and creativity—just like Alma Thomas’s work inspires all of us.
This blog was written by guest blogger Carla Barefoot who is an intern at SEEC’s office of engagement. She graduated from the University of Virginia with a major in Youth and Social Innovation and a minor in Global Studies in Education. Her passion for incorporating inclusive and equitable practices in community spaces has led her to strive to increase diverse and accurate representation in museums and youth work more generally.
As a 12-week intern at SEEC’s Office of Engagement, I had the amazing opportunity to dive head-first into contributing to the center’s anti-bias education journey. Although the approach is intentionally being integrated into every component of SEEC, from lesson plan creation to professional development opportunities, my particular focus was on ensuring that there is authentic and diverse representation of identities in the center’s books.
As this previous SEEC blog explores, it is developmentally important that early learners see a broad diversity of individuals in the media they are exposed to. This provides young learners with the opportunity to gain more confidence in who they are, as they may see someone who they find to be similar to themselves in a way. That said, it also allows them to familiarize themselves with people from different communities. In this way, books can support SEEC’s use of language that promotes the idea that people can be “the same and different” in many ways.
My contribution to this journey consisted of four major phases: evaluation, perspective-taking, analysis, and creation.
Evaluation
The beginning of the journey, evaluation, consisted of going through around 370 books at SEEC’s east court library. From here, the books were categorized as either red books, green books, or books to be weeded. If the book had content that stereotyped communities of people, was not developmentally appropriate, used inappropriate language, or was harmful in any way, they were classified as a red book. On the other hand, if the book had good representation of diverse communities and centered a developmentally supportive lesson or skill, they were classified as a green book that is highlighted for educators to use for their lessons, if applicable. Finally, weeded books are either damaged or have lower-quality stories that could be replaced by other books.
Perspective-Taking
This evaluation period served to build the foundation of my understanding of SEEC’s library – the books they had, the types of books they wanted, and those that did not lend to the overall purpose or values of SEEC. That said, I also wanted to look past the theoretical and gage what books were actually being used within the classrooms and how. To do this, I assisted with the weekly classes of the Smithsonian Early Explorer program, conducted informal observations within different classrooms, and asked to interview a few SEEC educators that work with different age groups. Through these experiences, I was both able to directly note how the youth themselves engaged with books when in their classes and gain insight into the thought-processes of educators when deciding when and how to use a book. I could then analyze the information provided from these two sources and draw some overall conclusions.
Analysis
I began by identifying some common themes across the interviews. Some of these include:
Role of books to normalize diverse representation
Importance of developmentally appropriate content
Using books to…
Connect to approaching site visits
Support skill-building
Dig into topics of interest to the class
Prepare for classroom transitions
These themes served as a jumping-off point to then scope out possible Smithsonian objects to center in the books that I would create for educators to use in their lessons.
Creation
When entering the creation phase of the project, there were a few priorities I kept in mind. Firstly, I wanted the content to focus on Latine culture and community, as these topics are authentic to my voice and desired contribution to SEEC’s library collection. Secondly, it was important that the books could be used for years to come, which limited my object search to either permanent exhibits or objects that were frequently rotated into display. Lastly, I found it important to provide educators with a variety of accompanying craft and/or activity choices they could engage their class in after reading the book. In fact, the primary reason why I chose to have such a heavy focus on exploring artist Verónica Castillo’s Tree of Life sculpture was because a SEEC class expressed a substantial interest in the object.
Now that it is the end of my time here, I look at the five books I created and hope that they highlight the importance of telling Latine stories through museum objects. That said, the topics of these books range from community and justice to clothing and identity. You can explore the digital adaptations of these books by clicking on any of the topics below:
Although there is still much to do, I hope the work that I have done at SEEC will lend to one overarching goal: for early learners to make healthy connections between the diverse stories they hear, their sense of self, and the communities with which they are familiar and unfamiliar.
What were your topics of exploration? Why did you choose them? Where did they come from?
During our walks outside, we noticed the Cottontails (infant class) seemed to enjoy when we pointed out the budding flowers to them. It is always exciting when the cherry blossoms reach peak bloom, so we decided to get into flower fever!
Why and how did you choose the visit?
As followers of @smithsoniangardens on Instagram, we were able to see when the various trees and garden displays were blossoming. Because our kids were on differentiated schedules, we needed to choose easily accessible locations so we could easily return to the classroom when our bottles and naps beckoned.
This class had previously learned about nature and plants through visits, art making and exploring objects.
What were your learning objectives? What did you want your children to take away from the lesson?
Sensory exploration is a great entry point for our age group, so our goal was for our kids to get familiar with the sights, smells, and textures of spring. We paid attention to their reactions to see where their curiosities were leading them.
Implementation:
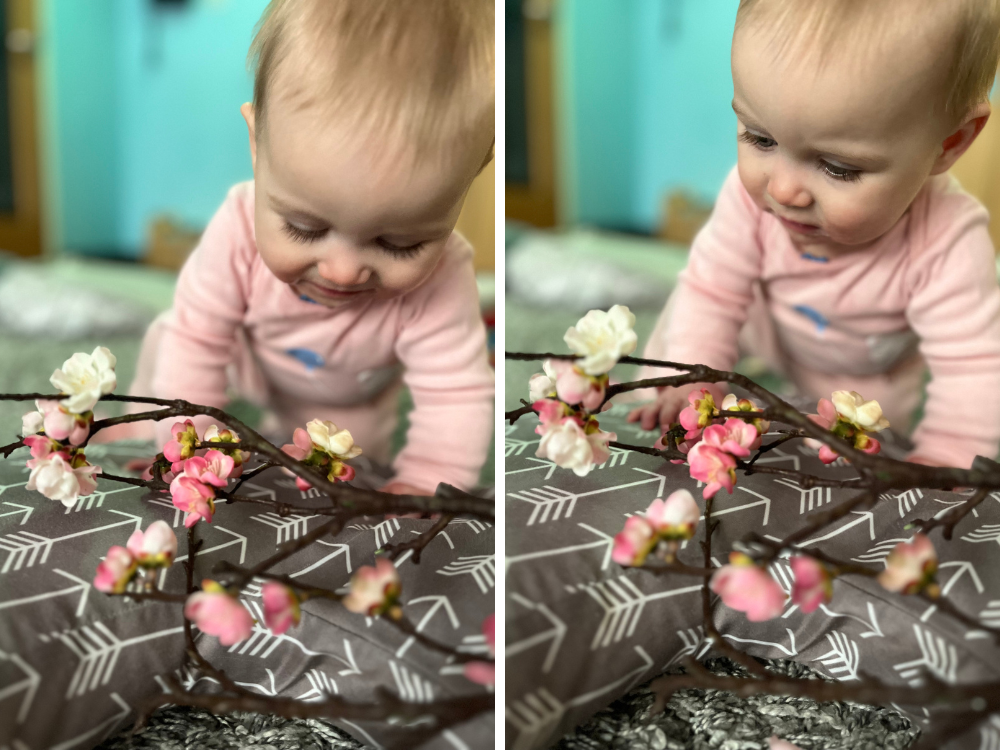
An infant child investigates a faux cherry blossom branch.
What activities did you use to engage the children in in the classroom?
We placed several new materials in the classroom to connect to our outdoor explorations. We brought in live cherry blossoms to decorate our counters and offered faux blossoms to the children for more in-depth investigation and pretend play. We gently fluttered the fake branches and blew on them so that it seemed like the branches were moving in the wind. The children enjoyed trying to imitate blowing the branches – this was also good practice for calming ourselves with deep breaths!
We also brought in baskets of soft, crocheted, cherry blossoms and placed them in baskets. The children practiced filling and dumping the baskets of blossoms and covering their bodies with them.
The class created ”flower petals” by dipping coffee filters in hibiscus and rose petal tea. The warm, yummy-smelling, tea provided a soothing sensory experience that the kids really seemed to enjoy.
Finally, we did a process art activity using hibiscus and rose petal tea to paint on coffee filters. The scent of the tea was delicious, and it created a lovely pink hue on the filters. After the project was dry, we laminated the pieces and hung them in the window for the children to continue to admire.
The infants look closely at and reach out to touch different flower petals including azaleas at the National Gallery of Art and the Saucer Magnolia flowers at the Haupt Garden.
What was it like taking the children out of the classroom to see various flower displays? How did you keep them engaged?
Outings with young infants can be tricky to schedule, especially in the chillier months when everyone has multiple layers to bundle up in! We found success by choosing our destinations strategically and paying attention to our children’s cues. We kept the Cottontails engaged by talking to them about the sights and sounds around us and lifted them out of the stroller to help get them closer to the flower displays. Connecting our adventures with song is another winning tactic – our Cottontails loved playing “Ring around the Roses” next to the azalea display in the National Gallery of Art!
How did you tailor your lessons to meet the learning needs of your age group?
Babies are always taking in information from the environment around them, so we do our best to let them explore freely and notice where their curiosities are leading them. While they aren’t able to communicate with language, we can understand so much by paying attention to what they are looking at or reaching towards.
Reflection:
What was most successful about your lesson?
We were proud of how active and engaged the group was throughout our explorations! By offering plenty of time and support for them to observe and interact freely with the materials and flowers, we were able to build on their natural curiosity and sense of focus.
When the children got a little restless in the stroller the educators helped them take walk (or dance) break and held them closer to get a better look at the flowers.
How did the lesson reach your objectives to expand the topic?
We tried to think creatively about how to offer a variety of sensory experiences that would help our Cottontails get familiar with the sights, smells, and feel of springtime blossoms. We later laminated the art project we made using hibiscus and rose petal tea and displayed it in our classroom window. Even after we had ended the unit, the children could look at the artwork and we would remind them of our springtime explorations.
What recommendations would you have for another teacher trying out this lesson?
Pay attention to the non-verbal cues of your students and offer as much free exploration as possible! Kids put everything in their mouths, so have a plan to discourage snacking on flowers while still acknowledging that appropriate developmental need.
This is the final blog of a six-part series on a project inspired by Bisa Butler. In this blog, SEEC’s former art educator Carolyn Eby reflects on the entire project which is discussed in-depth in the previous blogs – Inspiration, Batik, Collage, Sewing, and Kente Cloth.
Overall, the Bisa Butler inspired project could not have been more of a success. The process gave the children the opportunity to learn new skills like cutting fabric and sewing. It allowed them to explore textiles, learn more about the clothes they wear, and make connections between fabrics and their personalities.
Carolyn shows the children examples of what their finished glue resist fabric pieces will look like during a lesson on batik.
The project also introduced them to the artwork of Bisa Butler who the classes fell in love with. They even decided that Bisa Butler should represent the letter “B” in their classroom alphabets. Carolyn was excited to highlight the work of a Black, contemporary, female artist. She explained that she is continuously searching for more black, indigenous, people of color, and other underrepresented artists. She says that what we are currently doing, in terms of teaching diversity, is not enough. She cited the fact that most art museums show majority white men as their artists. As an art teacher, she strives to introduce young children to a wide variety of diverse artists so that the children are able to embrace artists like Bisa Butler.
The children became immersed in working on their Bisa Butler inspired fabrics.
When thinking about what she might have done differently, Carolyn explained that she could have slowed down and taught even more classes on the subject. Even though they worked on the project for a long time, six classes, Carolyn said that the children “didn’t seem tired of it.” If she had taught more lessons on the subject, she would have gone more in depth about how fabric is made. She explained that slowing down and truly breaking down ideas into their core components is something that she is always trying to do as an educator and is constantly surprised by how much further and deeper she could go with a subject.
Using textiles as a medium was a new experience for many of the children. They painted, cut, glued, and stitched as part of this project.
Another challenge for Carolyn was how the children interpreted the layering of fabric. Carolyn designed the project to allow the children to layer freely but as the children collaged fabric to their pieces, Carolyn noticed that they were beginning to cover up the beautiful batiks they had previously made. Even though she was excited for the children to use layering as an artistic aspect since Bisa uses layering as a technique a lot, Carolyn had not anticipated just how into layering some of the children would become. She felt conflicted because she wanted their batiks to be a visible part of the finished pieces, but she wanted the children to be free to express themselves. Upon reflection Carolyn said, “that was sort of a learning exercise for me, this is their art, these are their choices. You can encourage but you don’t want to move things or change things.”
Additionally, Carolyn had some concrete recommendations for anyone trying out this project:
Make collaborative batiks to use in the collage. Rather than individual batiks as the base of the project
Use thick string (not loose yarn) when sewing
While tidying up, Carolyn pauses to check in on a child who is working on their batik inspired fabric.
Lastly, Carolyn noted that a huge goal, for this project and all her projects, is for the children to “walk out feeling successful and capable.” She explains that her goal is not even for them to love art; it is more important to her that they feel capable. She wants to help give them the support so they can feel like they can keep going even if some of the skills are new or difficult. That was one thing that was great about the Bisa Butler project. By introducing them to making art out of textiles, the children were exposed to a whole new skill set. Carolyn worked closely with each child so they could feel both independent and secure in their abilities at the same time while working with a new medium for them.
This blog is part of a six-part series focusing on an art project lead by former art educator Carolyn Eby on Bisa Butler. This blog is part five and will focus on exploring Kente cloth. The previous blogs in this series include, Inspiration, Batiks, Collage, and Sewing. The last blog is a Reflection on the whole project.
For this lesson, the children learned about kente cloth. Like batiks, Bisa Butler regularly uses kente cloth in her designs, but she does not create or weave the fabric she uses. kente is probably the best-known African fabric. It originated with the Asante and Ewe peoples. Historically kente cloth was worn by kings; today, it is worn as a symbol of pride. People wear kente cloth to important ceremonies like weddings or graduations. kente cloth differs from batik because batik designs are printed onto existing blank fabric, while the designs on kente cloth are created in the weaving process. Learn more about kente cloth here.
Carolyn uses a large plastic bin to demonstrate the weaving process on a large scale.
While Carolyn did not want the children making or cutting up kente cloth, she did want to introduce the children to the idea of weaving. They handled woven cloth and compared the front of the cloth to the back of the cloth. The classes learned that the root of fabric is in hand woven cloth but that much of the clothes that they wear today have been made by a machine. Carolyn gave the children a couple of different opportunities to experience weaving. She set up a simple standing loom for them to explore and she created her loom using a large plastic bin with duct tape holding down the wrap fabric. This allowed her to space out the warp so the children could more easily weave the weft fabric.
Carolyn also wanted to carefully discuss the importance of the kente cloth. The children talked about why they do or do not wear kente cloth depending on their cultural background. She also wanted to highlight how this fabric is worn with pride and can represent aspects of a person’s cultural heritage. To explore this idea, she encouraged the children to choose cloth with patterns that might represent who they are.
Children added additional fabrics to their pieces that had special meaning to them.
She reached out to the families and invited them to send in old clothes or fabric that they felt comfortable with their child cutting up for this project. In her email to the adults, Carolyn explained that Bisa would use her parents’ clothing when creating her art. Many of the children instantly understood the importance of these clothes from home and many did not want to cut them up even though families had sent these fabrics for the purpose of being used in this project.
While some children choose not to cut up their old play clothes, others used these family fabrics in unexpected and beautiful ways. One child cut up pieces of their grandmother’s dress to add as finishing touches to their collage. Another child’s family sent in a skirt with bells on it. The child used only the draw strings and bells on their piece; carefully gluing only the strings so the bells could still move.
Adding the special fabric was the last step of the project. The children started by creating a batik inspired base, added fabric collage, layered that with sewing designs, and finished their piece by selecting cloth that represented them for finishing touches. Both the children and Carolyn could not have been more thrilled with how the artwork turned out!
Read Carolyn’s reflections on the whole project in our next blog.
This is part four of a six-part blog series on textile artist Bisa Bulter. The previous blogs were on Inspiration, Batiks, and Collage. The future blogs are on Kente Cloth and a Reflection on the project. This blog is on Sewing.
After the children finished collaging, Carolyn gathered up their artwork. Carolyn then started the labor intensive and noisy process of hammering holes using a leather working tool along the border of each of the pieces. Carolyn noted that using a hole punch would not have been ideal because it would have been hard on her hands and might have hurt the fabric that the children had already glued onto their art.
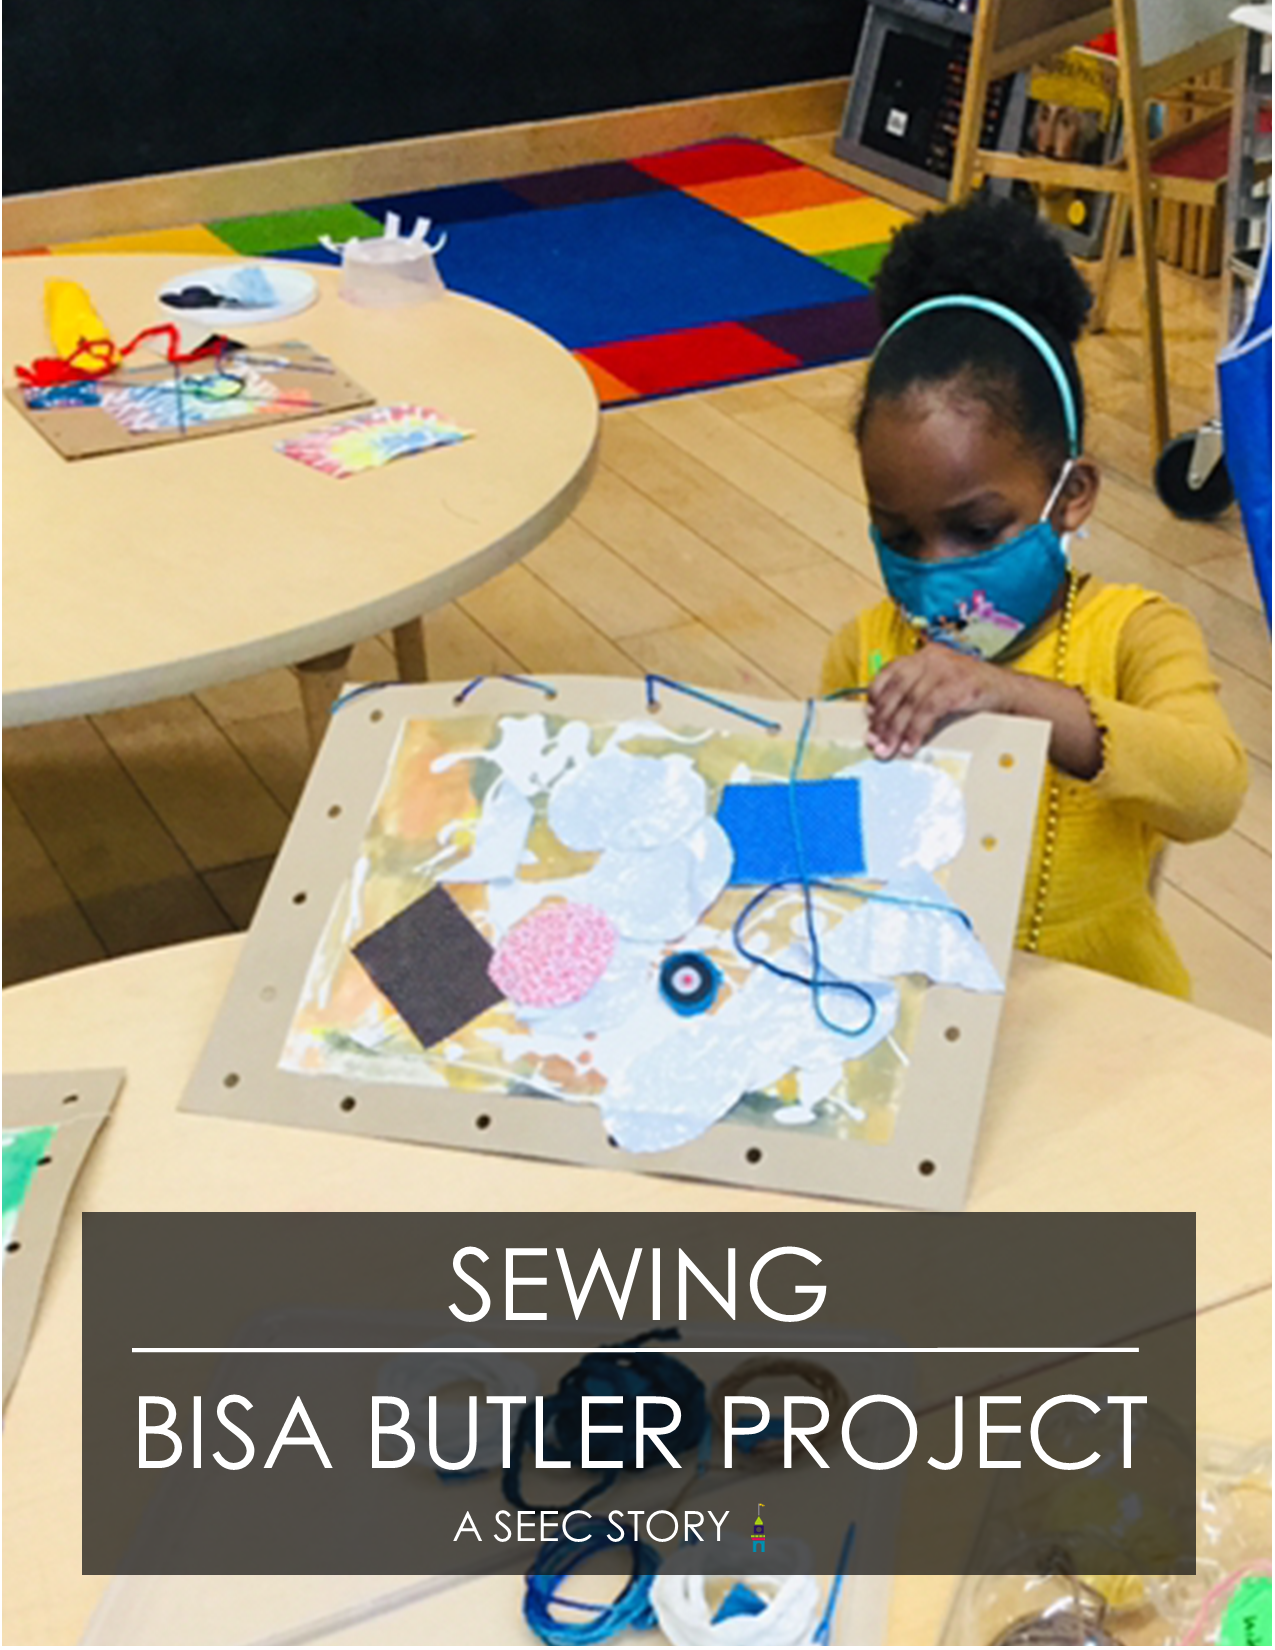
Children used large plastic sewing needles to thread yarn through the holes Carolyn created on the edges of their projects. They were invited to add stitches wherever they liked, even through the middle of their work.
Carolyn then replayed the video of Bisa Butler and had the children focus on her sewing techniques. The children loved watching Bisa use her huge sewing machine. It reminded them of driving a car or using a joystick to play a game. Carolyn encouraged the classes to observe how Bisa used the machine to make different types of lines with the thread. Carolyn explained to the class that they “don’t have to go around the outside. You can make lines going through the middle” with their thread. Knowing that they could stitch in any pattern they wanted was very freeing for the children; it really let them be creative.
Children learned to thread their needles by folding the end of their yarn into a piece of paper, they would then use this “hot dog” into the eye of their large plastic needles.
The children had to be taught the basic components of sewing. To show them how to thread a needle, Carolyn taught the children to use a “hotdog bun” technique that she learned from art teacher Cassie Stevens. Carolyn explained that “sewing is very different from any other art making activity” and the children had to learn a new skill set. But rather than getting frustrated, “they loved the stitching” and continued to use the techniques learned in future projects.
Carolyn set up a yarn station where children were able to choose and cut their own yarn. She repurposed the plastic packaging used to hold a set of apples from the grocery store to corral balls of yarn as children pulled and cut.
Learn more about the last step of the project in our blog about exploring Kente Cloth and read Carolyn’s Reflection on the entire project. If you would like to learn more about this project you can access our Smithsonian Learning Lab collection based on this lesson.