It’s Teacher Feature Thursday!
This week we are featuring our Art Enrichment educator Carolyn Eby. Carolyn works with all of our children here at SEEC, and on this particular day I joined her for a lesson with the 4-year-olds about artist Keith Haring and his use of silhouettes. Below you will find images from the lesson, as well as reflections from Carolyn.

What were your topics of exploration? Why did you choose them? Where did they come from?
I chose to study Keith Haring because I love his artwork and I think the topic is fun and interesting for the kids as well. We have been working all year on learning the different elements of art and for our first artist study, I wanted to find an artist that had great appeal and used all of the elements of art in a straight forward way in their artwork.
Why and how did you choose the visit?
The four-year-olds come to the art studio in the afternoon, and due to the timing of the day, we tend to stay in the art studio and utilize images of art, so that we have ample time in the studio to work on our artwork. For this visit I primarily used high quality printed laminated images, and I had enough so that every student had a different image to hold in their hands. It was fun to pass out the images and talk about them one at a time as we held them up.
What were your learning objectives? (What did you want your children to take away from the lesson?)
We have been learning about the elements of art so we looked at Keith’s work from a lot of very different angles. With this lesson in particular, we looked at the beginning of Keith’s career and how he used lines and silhouettes. We took a hard look at what a silhouette is, and how to create a Keith inspired piece mimicking the materials he used earlier in his career (white chalk and a black surface).
What was most successful about your lesson?
I think the kids loved learning about what a silhouette is by using the overhead projector and tracing each other. I love using collaboration and movement when explaining concepts in the art studio.
How did the lesson reach your objectives to expand the topic?
Earlier this year we studied lines as an element of art and had a lot of fun doing various projects and activities that touched on the idea of how lines are used in art. After my visit to the National Art Education Association National Conference in Chicago I learned a really fun game from a teacher that uses call and response, but also body movements to learn the names of different lines. The game is now a staple in my classroom and very useful, not only to review types of lines, but also allow children to get their wiggles out! After we warmed up with the game, we had a lot of fun looking at Keith’s lines. The kiddos picked up on his use of thick lines to add emphasis and exaggeration to his artwork, as well as how important his lines were in creating simple images. In a way, it was sort of like a treasure hunt identifying different lines he used! Building on all their knowledge and looking at it in a different perspective through a group of images from one artist made it easy to work on his use of color the week after. We are also looking forward to looking at his use of shapes, form and space.
What was successful in terms of your preparation and logistics?
Using the overhead projector in the space I chose worked out really well. The black chalkboard background served as a great backdrop for the kiddos to explore their silhouettes. I also was happy I had enough time to set up the simple materials in an easily accessible manner.
What could you have done differently to better achieve your objectives and expand the topic?
I think I could have spent a little more time introducing Keith before we dove into his artwork. Providing background information about an artist in a narrative form helps children to become interested and connected to that artist. If I had spent more time introducing Keith, the children would have had a better context for his pieces and concepts we learned about during the lesson.
What was challenging regarding logistics?
Overall, I am always working towards creating smooth transitions between lessons, and keeping the kiddos focused as we move from project to project. Since we recognize the importance of the environment on the children’s overall experience, the studio space itself can prove to be a distraction as it has a hallway running through it that happens to be a major artery to the school, and is also very close to the student bathrooms. I am always trying to redirect and gain focus since there is a lot going on around us. It is also tricky to learn how best to use the space for furniture and activities, and I am always changing things or looking to make them work more to my favor.
What recommendations would you have for another teacher trying out this lesson?
I would recommend that you think carefully about how you are going to introduce Keith. Though his art is fun and delightful to look at, a lot of his work is also very controversial and you have to be ready to answer some difficult questions. A lot of the kids were fascinated by the fact that he had been arrested for putting his artwork on the subway panels of New York City, but we talked about consequences to actions.
Here are a few images from Carolyn’s Keith Haring lesson:

Carolyn began her lesson by playing a movement game. In previous lessons the children learned about types of lines that are used in art. Carolyn called out different lines and the children made their bodies into line shapes, for example, “vertical”, “zig zag” or “spiral”.


Next, the group looked at images of Keith Haring’s art and made observations. They first noticed the thick black lines, the movement of the figures, and the lack of details like facial features. Carolyn told the children that Keith Haring really loved Walt Disney and cartoons, and you can see that inspiration in his art. She explained that the thick black lines around Keith Haring’s people and objects is called a silhouette.


Carolyn turned on an overhead projector and showed the children how you can stand in front of the light and see your silhouette on the board. Then she split the children into two groups and they each got a turn to play Silhouette Dance Party, where they danced in front of the light until the music stopped and they had to freeze and notice their silhouette. When they froze Carolyn pointed out different parts of their silhouettes, for example, “I can see your hair in your silhouette very clearly” or “the way you are holding your arm above your head makes a very interesting shape.”


After their Silhouette Dance Party, the group came back to the carpet and took turns drawing a silhouette around one of their classmates. As they were tracing, Carolyn pointed out that the child’s boots will make the silhouette look a lot like Keith Haring’s art because he drew people with big feet and hands without toes or fingers. One of the children said to the child they were tracing, “Make fists with your hands so that our outline won’t have any fingers!” Once they had completed the silhouette the class took turns adding all sorts of lines around the outline to make it look like it was moving.
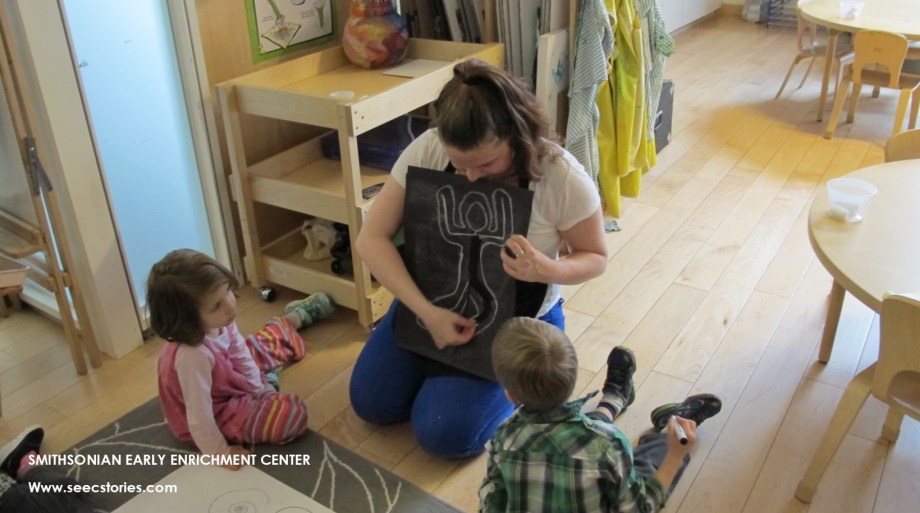
After making their group silhouette, it was time to make their own Keith Haring inspired pieces. Carolyn showed the group how to get started and the materials they would use – black paper and chalk. She explained that they are using chalk because that is how Keith Haring got his start. Since some of his early drawing was with chalk on New York City Subways signs, it also gave the students an opportunity to talk about when and where drawing and painting is appropriate.
 Then the group got busy drawing!


The children drew stick figures, outlined the figure to make a silhouette, and then used a wet cotton ball to erase their figure. Lastly, they added lines around their silhouette to make it look like it was moving.

 Before putting their pieces in the rack to dry, Carolyn helped each child spray their work with starch spray so that the chalk would stay in place.


 Once the children completed their artwork, Carolyn invited them to play more with the projector. She provided popsicle sticks and encouraged the children to arrange them in different shapes, letters or numbers and see how it looked on the wall.
After learning about Keith Haring’s use of lines, Carolyn continued teaching the preschoolers about his use of color and shapes. Check out our Facebook, Twitter, Instagram, and Pinterest for more ideas from their unit on Artists! See you in two weeks with our next Teacher Feature!
