Museum educators have been practicing object-based learning (OBL) for years. It has been written about and discussed extensively. This blog isn’t so much meant to expand on that literature as it is meant to explore how OBL is used within the SEEC model.
First, let’s define SEEC’s learning environment. We are so much more than a daycare. We consider ourselves a school whose approach is defined by high quality early childhood practice. Our curriculum is emergent, and we use the community – not just museums – as part of the learning experience. Moreover, our Office of Engagement focuses on family learning via both long-term and stand-alone programs.
Definition
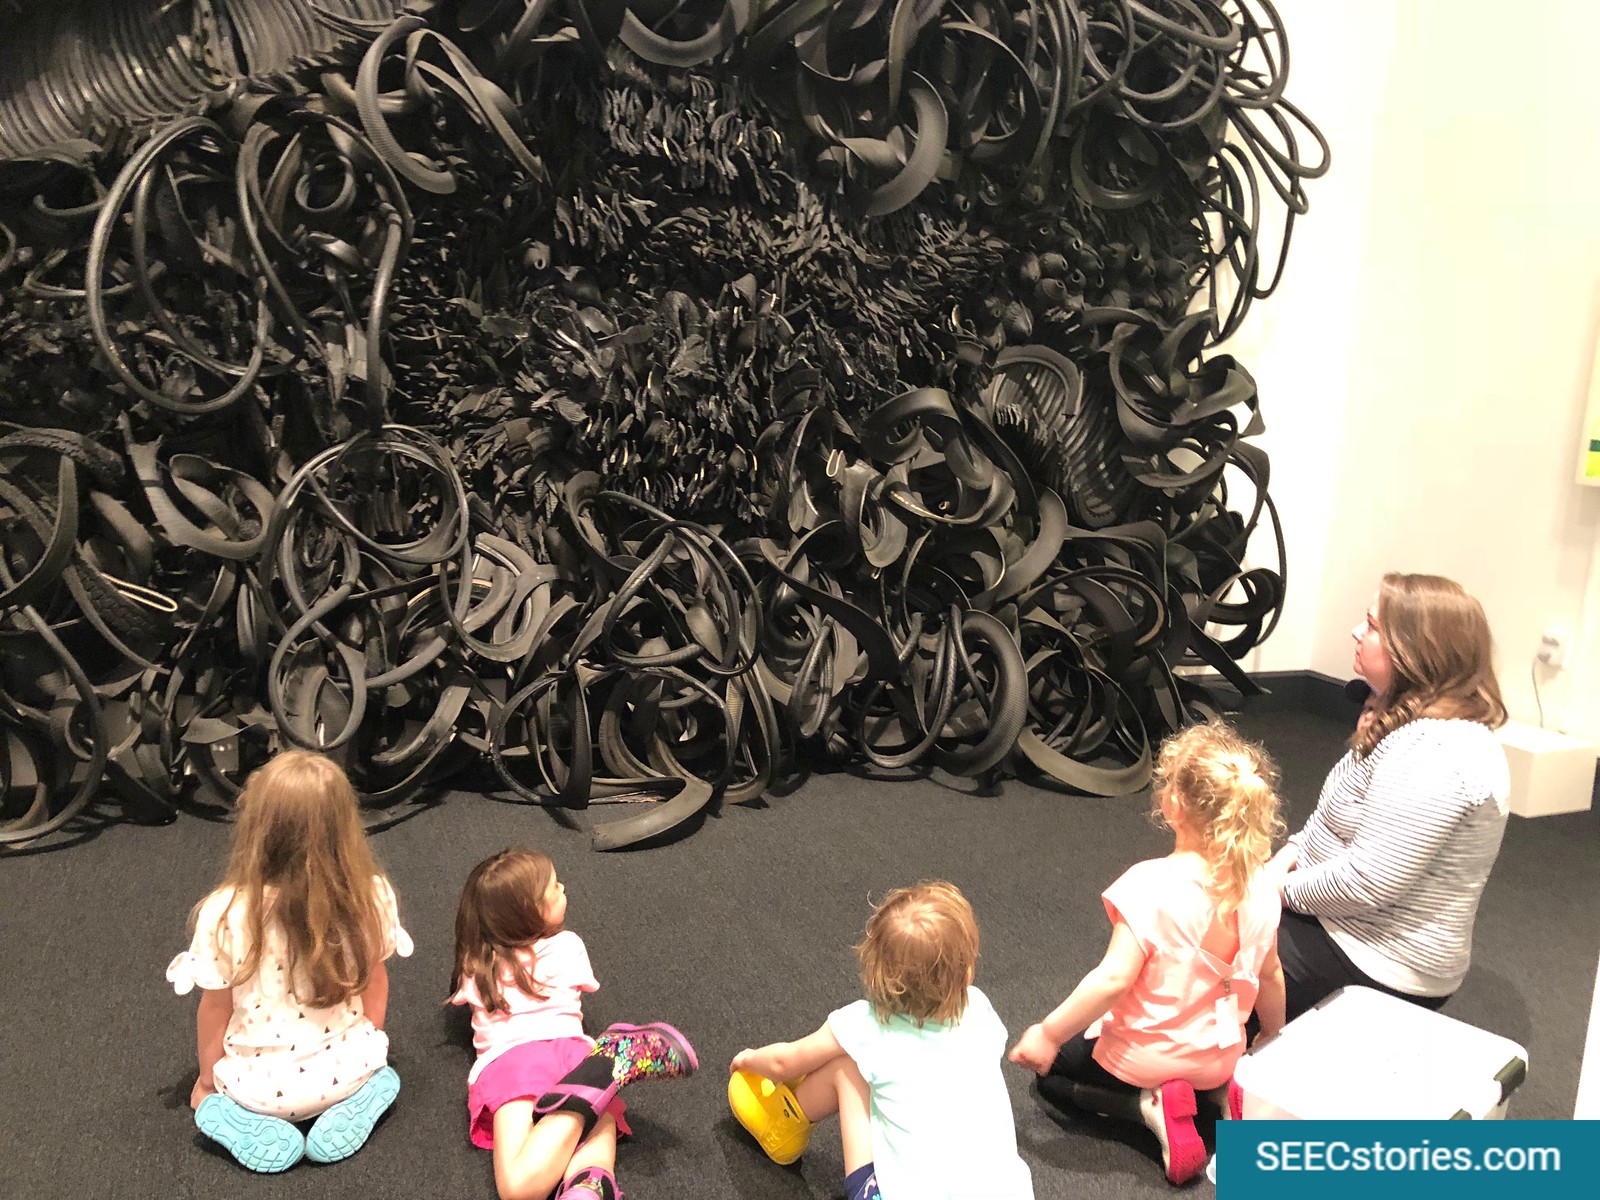
How does SEEC define OBL? At the center of our definition is, of course, the objects on display at the Smithsonian. All of our classes, even the infants, visit the museums regularly. While the experience will look different for each age group, all children benefit from being in front of an object. There could be an entire blog on this topic, but we recognize the importance of seeing the real thing – the awe and wonder it inspires. For children under two, who can not necessarily grasp the significance of these objects, the value often resides in their exposure to new spaces, things, and environments.
Tactile
Because our children are young, we add an additional layer to the OBL experience – the tactile component. Children are concrete learners who explore using their senses and therefore, employing objects that can be handled or physically experienced adds to their learning. This can be a toy, like the boat pictured here, or it could be an element that somehow better describes an object. For example, manipulating a ballet shoe while looking at one of Degas’ dancers.
Sensorial
At SEEC, we expand upon this idea to curate a sensorial experience by adding components like feeling the wind while looking at this painting at the National Gallery of Art by Winslow Homer. The moving air, though not a physical object, certainly takes on that role with the learner. What’s important for the young learner is that they get to observe the wind portrayed in an actual object, like a painting, and feel the air moving on their faces. These experiences enhance their understanding.
Experiment
Likewise, the “object” can also be defined as an experiment. Imagine that a class visits the transportation hall at the American History Museum or observes vehicles moving on a street. The group could experiment with wheel shapes. A teacher constructs a car out of cardboard and uses a simple ramp to demonstrate how the car moves with wheels that are square, circular and triangular. Students quickly see the benefits of having a circular wheel and begin to recognize differences in shapes and how they connect to things in their everyday life.
Nature
For educators working in or using informal learning environments, object-based learning should be considered through a wider lens – one that helps young children to experience and explore via multiple modes. Finally, OBL also corresponds to nature-based learning. Just this week I observed how a lesson on nests with toddlers incorporated both museum objects and nature. The lesson started out by looking at nests sculptures displayed outside the Natural History Museum and concluded with the children making their own nests by collecting twigs, grass, and leaves. To add an additional layer and to help the children better interact with the animals, the children helped throw birdseed and watched as the birds came to eat.
At SEEC we believe that young children are capable of understanding complex STEM concepts when taught in engaging and developmentally appropriate ways. A recent study from The Joan Ganz Cooney Center at Sesame Workshop and New America, found that while teachers are also excited and capable of teaching STEM skills, they need more knowledge, support, and training to be effective. A policy report from The Early Childhood STEM Working Group states that many educators have STEM anxiety, which can lead to avoidance of STEM teaching, with negative STEM mindsets being unintentionally transferred to students.
Why do early childhood educators have this feeling of inability and uneasiness surrounding STEM? Research illuminates one possible reason: many adults in the United States do not feel that they are knowledgeable enough in STEM subjects. Reflecting from our own experiences lesson planning, we also recognize feeling uncomfortable when the children are curious about a STEM concept we know nothing, or little about. However, at SEEC, we do not believe you have to be an expert in STEM to explore it with the children. After all, early childhood educators are experts in so many areas already: child development, social emotional skills, collaborating with caregivers about behavior challenges, first aid, documenting learning…and the list goes on.
At SEEC we believe in lifelong learning, so when we’re confronted with children’s enthusiasm surrounding a topic we’re unfamiliar with, we see it as an exciting opportunity to seek out new knowledge and model learning for children. To prepare for a new STEM subject we have several tools and strategies:
Community: We talk to colleagues, families, and community members who have an knowledge in the area. This can be a great and authentic way to make home-school connections, or relationships with community members.
Online research: While we research on our own, we also involve the children in this process to build technology competence, as well as inquiry and critical thinking skills. With the younger ages, we might use our class iPads to look up the topic and narrate what we’re seeing with the infants and toddlers while showing them what we’ve found.
Libraries: Often times our teachers will take their class to the library to pick out books related to their topic. If they can’t get to the library with their class, they will look at the library online catalog and choose books together.
Museums: We’re fortunate to be located on the Smithsonian campus, so we utilize the museums to seek out answers to our burning questions. If you’re not located near a museum, we suggest using Smithsonian’s Learning Lab to visit the museum digitally.
Apart from our preparation techniques, we also utilize art and inquiry as a strategy for incorporating STEM into everyday lessons without much prior prep time. We often use artwork related to the STEM topic to practice inquiry and critical thinking. The educator does not necessarily have to know much about the subject matter, but can participate in the question asking and careful looking. This will provide questions that the class would like to research further and can focus your exploration. It’s helpful for the educator leading the group to know where to start with a topic, especially if the topic feels overwhelming.
To support educators outside our school, we share STEAM lessons we have created through our blogs, such as lessons on blood, wrecking balls, butterfly wings, seed dispersal, and more. We also offer Educator Workshops to share our practices, and how to use artwork as a powerful vehicle to develop STEM skills.
Want to learn more? Join us for our educator workshop Full STEAM Ahead on Thursday, February 20th from 4 PM to 7 PM at the National Museum of Natural History.
We take a look back at a blog that we published three years ago around Thanksgiving, hoping it will help educators think about ways they might consider talking about other cultures all year around.
As we discussed in our previous blog, the National Museum of the American Indian (NMAI) and the Smithsonian Early Enrichment Center have teamed up to provide teachers with a framework for exploring culturally diverse topics in their classrooms. We believe that early childhood educators are in a unique position to craft experiences for young children that will help them appreciate the diverse world around them. We also feel that it is important for children to see themselves reflected in their classroom in order to develop a positive sense of self.
Though we published the first blog just before the Thanksgiving holiday, we specifically wanted to post the follow-up afterwards as a reminder that teachers can explore American Indian culture throughout the school year.
Before we look at the lesson, it is important to note that I had only a week to implement it and I struggled with how to use the limited time frame best with the students. Ultimately, I decided that it was important to begin the lesson with what was familiar to the students and build on that. Had I had the opportunity to continue the lesson, I would have most certainly spent more time exploring Wampanoag culture and ensuring that the children were introduced to the Wampanoags in a contemporary context.
Lesson Objectives
observe natural materials and weather in our own environment and how these elements vary in other environments
demonstrate that not all homes look the same, but all homes do have the job of protecting us.
introducing three different types of American Indian homes and explore the natural materials out of which they are made.
investigate the materials used to construct wetus and how those materials serve as protection against their environment
Day 1
We began our morning with a visit to the National Mall where we used our senses to explore what was part of our environment. I wrote down the children’s responses and then we headed to the National Gallery of Art where we sat in front of Albert Bierstadt’s Mount Corcoran. Together, we recreated the landscape with representative objects and worked as a group to create a “soundscape.” To create the soundscape, we identified a sound for each element of the landscape. Once complete, we assigned a sound to small groups and then produced our soundscape all-together.
Day 2
When we were on the Mall, I observed the children were noticing elements of their environment that were man-made, so I thought it was important to use day two’s lesson to distinguish between the natural environment and human-made environment. This discussion transitioned nicely into a conversation about weather, which was another natural component of our environment. We identified different types of weather by making a list and then creating our own weather movements. We watched a weather report and read Sky Tree by Thomas Locker. While we read the book, we paused to use our weather movements when they were mentioned.
Day 3
Before heading out for the morning, we reviewed the different types of weather and discussed the weather that day. We walked to the National Gallery of Art’s Sculpture Garden to visit Roy Lichtenstein’s House I. We spent a few minutes walking around the house and then I asked the students to share what they noticed. Following their observations, I asked them if they thought that the house was a good one. There was a consensus that it would not be a good house to live in because it wasn’t real – it was open on the backside. I agreed that I didn’t think the house was doing what a house or home needed to do. I asked them what homes were for, to which I heard responses like: “to play in, eat in, sleep in.” I agreed and pulled out a blanket – I said the blanket was a lot like a home – it could keep me warm when it was cold, it would keep me dry if it rained. I concluded that both the blanket and the home could protect me from things in my environment.
I asked the group whether they thought that everyone lived in the same type of home. We had a short discussion about what our homes were like, the other educators with us shared that they lived in an apartment. We then began to make a home collage. Students shared photos of their homes and we placed them on large sized paper. I also brought photos of homes from around the world and as we placed them on our collage. When we finished, we discussed the similarities and differences.
Day 4
I began this class by asking the students about the Thanksgiving holiday that was coming up. Each child excitedly shared what they were planning to do for the holiday. I shared was formed around the idea that two groups of people came together to have a meal. One group had come to America from a place called Europe and another had lived on the land we call America for a very long time. I explained that these people who had been living here for a long time were often referred to as American Indians and that in fact, there are many groups of American Indians. I shared a map and said that each group has their own language, clothing, traditions, and of, course, homes. I also pulled out our sensory bins that were representative of a Eastern coastal environment, a desert environment, and an Arctic environment. We looked at the bins and discussed their physical features and imagined what the weather would feel like. We wondered together whether the homes in these environments would be the same or different.
We then walked to the ImagiNATIONS Activity Center at NMAI and invited them to play in the Native homes area. When we sat down, I asked them what they noticed about the different homes. After sharing their own observations, we talked about how each of these homes came from a different type of environment – a lot like our sensory bins. I brought objects that demonstrated the connection between these homes and their environment. For the iglu, I had a simple bottle of water; for the tipi, I had a photo of a buffalo, and for the adobe house, I had some mud and straw. I shared my objects with each student in the circle and left them with the reminder that Native peoples live in many places throughout the country and their homes tell us a lot about their environment.
Day 5
On our last day together, I reminded them about that Thanksgiving meal. I said that many people assume that the American Indians who ate with the Europeans during that meal lived in tipis. We paused to recall the tipi we had seen the day before and then I shared with them that the Native peoples who were at the meal so long ago actually lived in wetus and they are called Wampanoags. Using 1621: A New Look at Thanksgivingby Catherine O’Neill Grace, we explored some of the photos of what life for the Wampanoags looked a long time ago. I was careful to note that the photographs were of people pretending to be from a long time. They were helping teach people today about what life was like in the past.
We proceeded to watch parts of this video. We looked at the materials of the winter and summer wetu. We decided that all of the materials were from nature and we took a closer look at cattail reed mat provided by NMAI that would have covered the roof of the summer wetu. We talked about how the rain water would slide off the reeds and keep the house dry. We also blew through the mat so we could feel the way the breeze could come through and help keep the space cool.
We ended our morning by taking a nature walk and collecting materials. We broke out into smaller groups and built houses out of our materials.
In addition to the lessons, the teachers planned the following learning centers for the children to interact with during free-time.
Dramatic Play – Kitchen, office, or playing house
Fine motor – blocks or other loose parts for building (include photos of different types of houses from all over the world)
Environment – This sensory station recreates three different types of environment
North Eastern – Wampanoag – inland/coastal environment with forest, ponds, grass, sand, and water
Choose two others.
Dramatic Play – weatherman
Puzzles and Maps – United States
By no means is the lesson an all-encompassing study of Native Peoples or the Wampanoags, but it is a realistic snapshot of how with a little planning we, as educators, can begin to develop lessons that share more accurate information that help our students see that the world from multiple perspectives. Let us know what you are doing in your classroom to help combat stereotypes and create an inclusive environment.
If you visit our toddler and twos classes you are bound to hear joyful voices singing songs as they begin their morning routine. The classes sing hello to each student, use songs during their morning circles, and to help ease transitions throughout their day. While a chorus of young voices is undeniably sweet and fun, their singing is helping to set a strong academic foundation by strengthening the children’s pre-literacy skills.
Songs & Vocabulary
When children hear a song, they are exposed to new words. The words that young children hear, whether spoken or sung, are the words that form their vocabulary. The repetitive nature of many song lyrics, combined with the fact that children are likely to hear the same song many times, gives them the opportunity to fully learn new words. Later in their academic lives, this understanding of a variety of words will help with their ability to read and their overall reading comprehension.
Songs, Sounds, Rhymes
For very young children, listening to songs exposes them to the many different sounds that make up our words. As you sing a song, you emphasize certain sounds and by doing so, you highlight the building blocks of our language. Singing gives the youngest children the opportunity to mimic and communicate with these sounds in a way that is ideal for toddlers. When singing, they are given the freedom to be loud, let their voices ring, and play with sounds. Additionally, a child whose words often slur together or who regularly skips words while speaking is often able to sing a tune in such a way that an adult will know what they are singing. This can hold true even in cases where the adult is not able to understand many of the individual words being sung. Children rely on the sounds they learned while singing when they start sounding out words and when they are developing the ability to read.
As young children develop pre-literacy skills, they begin to have the ability to rhyme. Singing songs such as Willoughby Wallaby Woo, Down by the Bay, and Silly Nilly Name Song allow children to explore rhyming sounds while singing. Pausing before you say the rhyming word can give the children the chance to fill it in, which helps children progress from hearing rhymes to creating their own rhymes. These singing games can provide hours of entertainment while challenging young children to explore sounds and rhymes.
Songs, Symbols, & Letter Recognition
A crucial component of learning to read is recognizing that the letter “m” means the sound “mmm”. In order to learn this, children must first understand the use of symbols, because the letter “m” is a symbol for the sound “mmm”. Children begin recognizing symbols well before they are ready to read and symbol recognition is considered an important pre-literacy skill. While using songs to help children understand letters may seem unlikely, song cards offer the ideal opportunity to pair singing with symbol recognition.
Songs cards are images that are used to represent or be a symbol for a particular songs. For example, an image of a sun might be used to represent Mr. Sun and a star might be used to represent Twinkle, Twinkle. When using song cards, make sure that image is large, engaging and/or colorful. Also be sure that the images are double sided and laminated for durability. Then dramatically spread the song cards out in the middle of the circle and encourage the class to explore the cards. As they pick up the images, sing the corresponding song. Over time, children will learn that specific images represent their favorite songs and will go out of their way to find these images. Young children love using these song cards because it helps them to communicate what songs they want to sing without having to come up with the name of the song or even the tune. In essence, song cards help young children to learn about symbols in a way that is appealing to them by helping to fulfill their need to communicate their wants and desires.


 If you visit our toddler and twos classes you are bound to hear joyful voices singing songs as they begin their morning routine. The classes sing hello to each student, use songs during their morning circles, and to help ease transitions throughout their day. While a chorus of young voices is undeniably sweet and fun, their singing is helping to set a strong academic foundation by strengthening the children’s pre-literacy skills.
